
Adding Hosts to your Network
Welcome to MSLN. This guide will walk you through adding hosts (eg. computers, printers, etc.) to Network Management, the web-based network management tool written by UMS-ITS.
Note: For the purpose of this tutorial we will use the fictitious library of "Pleasantville Public Library" located in "Pleasantville, Maine" and managed by a "Barbra Smith".
Index
Logging In:
Connect to Network Management by visiting the website: https://nm.msln.net. You will see the following screen:
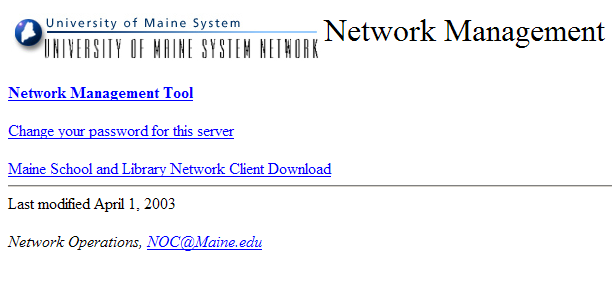
Select "Network Management Tool" to access Network Management. You will be prompted to enter your "NM" username and password:
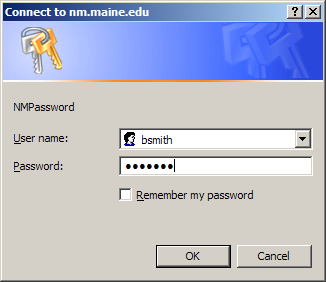
Enter your assigned Network Management username and password, then select "OK" to continue.
Note: If you have forgotten your Network Management username or password contact MSLN for assistance: 1-888-FOR-MSLN (Toll Free).
Viewing your Subnet:
Once signed-in to Network Management you will be presented with the following page:
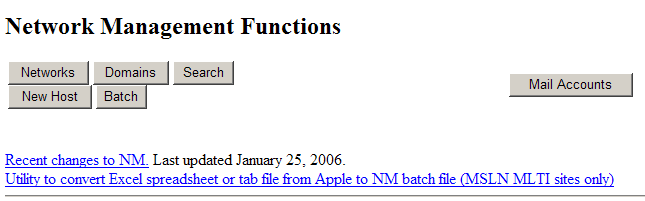
Network Management provides access to administer your IP Network and Internet Domain Name (DNS). Clicking on "Networks" or "Domains" will bring up a listing of authorized components. We willbegin by selecting "Networks".
After clicking the "Networks" button you will see a listing of authorized networks:

In this example the current user is only authorized to manage one network. In the "Subnet" column, short for sub-network, the network number is shown as a hyperlink. The network number is a special IP address that is used to identify a sub-network. It is reserved and cannot be addressed to a host.
Click on the subnet you wish to manage. Note that a description of each subnet is provided in the rightmost column.
Upon clicking a subnet you will be presented with a page similar to the following:
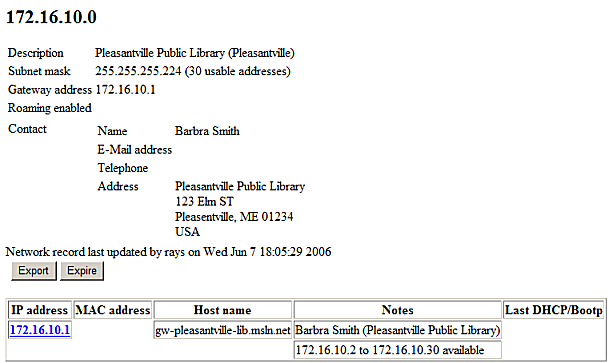
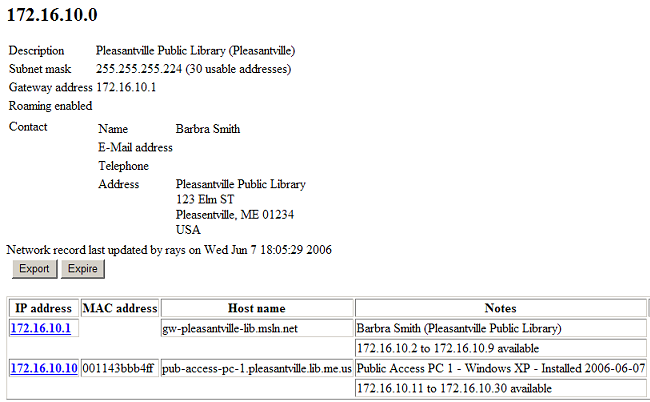
At the top of the page you will find detailed information on the current subnet. Displayed at the top of the page is the network number of the current subnet. Also provided are the subnet mask and gateway address. This information may or may not be relevant to you depending on your level of knowledge in computer networking.
Also listed is the current contact information of the person responsible for management of the subnet. You should always ensure that this information is current by contacting MSLN if any changes are necessary.
At the bottom of the page you will see a table of host entries on your network. A host is a device that is on a network. This can be a computer, a network printer, or any device that is connected to your network.
We have not added any hosts to this subnet yet so we only see one host entry. This is a special host entry. It is the gateway device on your network. It can not be changed or deleted from your network and is necessary for network operation.
A gateway is a device that tells computers on your network how to reach other networks. This is also called a router. This is actually the device that establishes the connection between your network and MSLN.
Host entries are shown as a hyperlink. Clicking on the IP address of a Host entry will bring up the host configuration page. Note that access to the gateway host entry is restricted, so clicking on it will only result in an authorization error.
Adding Hosts:
The most common task Network Management is used for is the registration of new hosts. No computer will receive network configuration without being registered in Network Management. So it is necessary that you create host entries for each host you wish to add to your network.
Configuring a computer to access a network requires a set of information including an IP address, a gateway address, a subnet mask, and name server addresses. Thankfully, Network Management will deliver this information to registered hosts automatically by means of Dynamic Host Resolution Protocol, or DHCP.
To add a host entry for a computer you will need to determine the " MAC Address," sometimes referred to as the "Hardware Address," or "Physical Address," of the network adapter being used to connect. For this example we will add a Windows XP workstation to our subnet.
Finding your MAC address
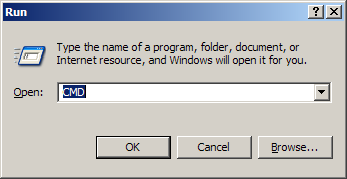
To determine the MAC address of a Windows XP computer we need to open the command prompt by selecting "Start" > "Run..." and typing the command CMD and clicking "OK".
A "Command Prompt" window should appear:
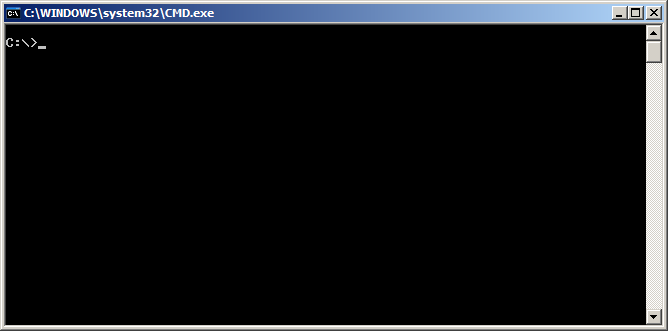
Here type the command: ipconfig /all and hit the "OK" button.
Scroll up and look for the section that lists the
network adapter being used to connect to the network. In most cases it will be something along
the lines of "Ethernet adapter Local Area Connection:" :

Here we are looking for two pieces of information, firstly that DHCP is enabled, and second the
physical address of the host. For the example host shown above the MAC address would be
001143b8b4ff. Always exclude punctuation or spaces when entering a MAC address in
Network Management, for example: 00-11-43-B8-B4-FF would be incorrect.
If DHCP is not enabled you will need to enable it. If you require further assistance please contact MSLN for assistance using our toll free number.
Creating a new Host entry
Now that we know the physical address of our host we can enter it into Network Management. In NM, click the "New Host" button at the top of the page. You will be presented with the following:
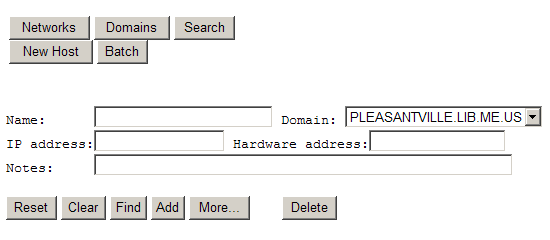
Here we will add the information for our new host. Only two pieces of information are required to register a host: a name, and a hardware address.
You can name a host anything, but you should try to be as descriptive as possible, while keeping names short. This computer will be a public access computer. We'll name it "pub-access-pc-1".
Note: It is also good practice to add a note entry formally describing the host.
Click the "Add" button and you will see a confirmation message saying the host was added:
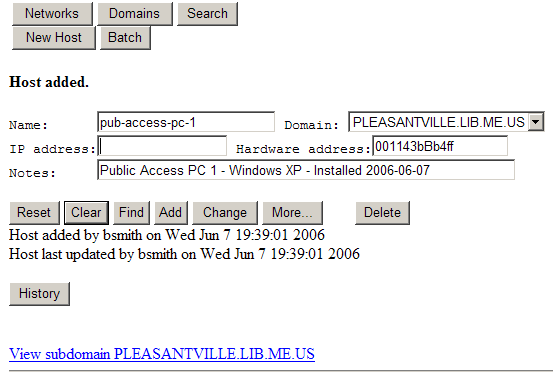
Note that this host does not have an IP address. Hosts entered without an IP address will automatically be assigned the first available IP address on your network. This is known as dynamic IP addressing. If we want this host to always receive the same IP address we can enter one in the host configuration. This is known as static IP addressing. It is good practice to assign IP addresses to any host that will be on your network the majority of the time to ensure that they will always have an address available to them.
Our first available IP address is 172.16.10.2, but we can use any address in our range of
172.16.10.2 to 172.16.10.30. By convention the first few IP addresses are
usually used for any servers or critical systems on a network, so we'll start addressing the public
access computers at 172.16.10.10, rather than 172.16.10.2.
Note: You can only assign IP addresses that are in a subnet you manage. The IP addresses used in this example are designated private addresses and will not work.
Because we have already added this host, we will hit the "Change" button, rather than "Add" after adding an IP address:
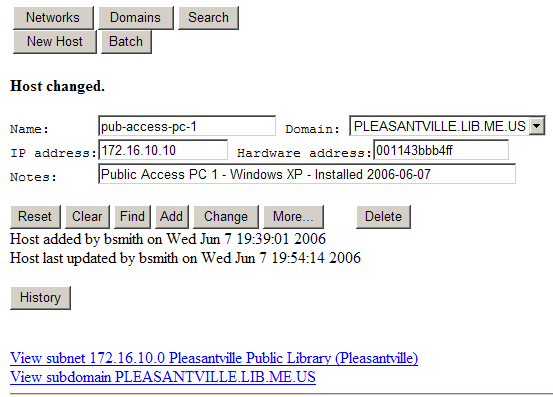
Note that the host now has two hyperlinks at the bottom of the page, "View subnet..." and "View subdomain...". Clicking on either of these links will take you to the corresponding Subnet, or Domain page, respectively.
Let's click on "View Subnet..." and return to our host listing. You can get there by clicking "Networks" and selecting the subnet entry as well.
We can now see the added host in our subnet:
Rebooting the computer should now get it to pick up its network configuration from Network Management. You should now be able to browse the Internet using your new host.